You are viewing a read-only archive of the Blogs.Harvard network. Learn more.

Moving from Redmine to GitHub Issues

Recently, we moved from Redmine to GitHub Issues for sake of transparency/consolidation.
Issues_·_IQSS_dataverse
Taking advantage of the RedMine and GitHub APIs, we wrote an unpolished/try-to-get-the-job-done-by-wednesday python program redmine2github to make the switch. The process was roughly as follows:

  1. Copy each redmine ticket to an individual JSON file. Information included:
    • Comments (journals)
    • Relations
    • Child Tickets
    • etc
  2. Manually created the following mappings. (All mappings are optional with the program)
    • Name Map between Redmine and GitHub users. This allows translation of Issue creators, Commenters, and Assignees
    • Label Map to translate Redmine attributes to GitHub labels. Note: the first column, “redmine_type” is not used by the program–it’s a reference for humans. The file/program are “dumb” and don’t look for name clashes in the “redmine_name” column.
      • Note: By repeating columns 3 and 4, 2 or more “redmine_name”s may be translated to the same label. In the sample file, the first three Redmine Names: “New”, “In Review”, and “In Design” are all moved to the label “Status: Design”
      • IMPORTANT: If a label map is used, any “redmine_name” not on the map will be ignored. If a label map is NOT used, the “redmine_names” will be made into labels–but with no color attribute.
    • Milestone Map to translate Redmine “fixed_version” to a GitHub milestone. This works similarly to the Label Map with an import distinction below:
      • IMPORTANT: Differently from the label map, any Redmine “fixed_version”s not found in the milestone map, will be created in GitHub.
  3. Ran the issue migration (mm.migrate_issues()) several times on newly created test repositories–that were then deleted. This helped work out bugs, etc.
  4. Ran the issue migration against the real repository (this will “spam” users if you use a name map)
    • The migration creates an issue mapping file with JSON that maps { redmine issue number : github issue number }
    • Part of the mapping file:
{"4096": 647, "4097": 648, "4098": 649, "4100": 650, "4101": 651, "4102": 652, "4103": 653, "4104": 654, "4105": 655, "4106": 656, "4107": 657, "4108": 658, "4109": 659, "4110": 660, "4111": 661, "4112": 662, "4113": 663, "4114": 664, "4115": 665, "4116": 666, "4117": 667, "4118": 668, "4119": 669, "4120": 670, "4121": 671, "4122": 672, "4123": 673, "4124": 674, "4125": 675, "4126": 676, "4127": 677, "4128": 678, "4129": 679, "4130": 680, "4131": 681, "4132": 682, "4133": 683, "4134": 684, "4135": 685, "4136": 686, "4137": 687, "4138": 688, "4139": 689, "4140": 690, "4141": 691, "4142": 692, "4146": 693, "4148": 694, "4149": 695, "4150": 696, "4151": 697, "4153": 698, "4154": 699, "4156": 700, "4157": 701, "4160": 702, ....}
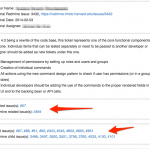
  1. Run migration part #2 (#mm.migrate_related_tickets()) which updates the GitHub Issue descriptions with links to related and child tickets as defined in Redmine.
    • The result of the related/child tickets looks something like:
      Permissions_·_Issue__27_·_IQSS_dataverse
  2. Run a script to update the Redmine tickets with a link to the new GitHub Issue.

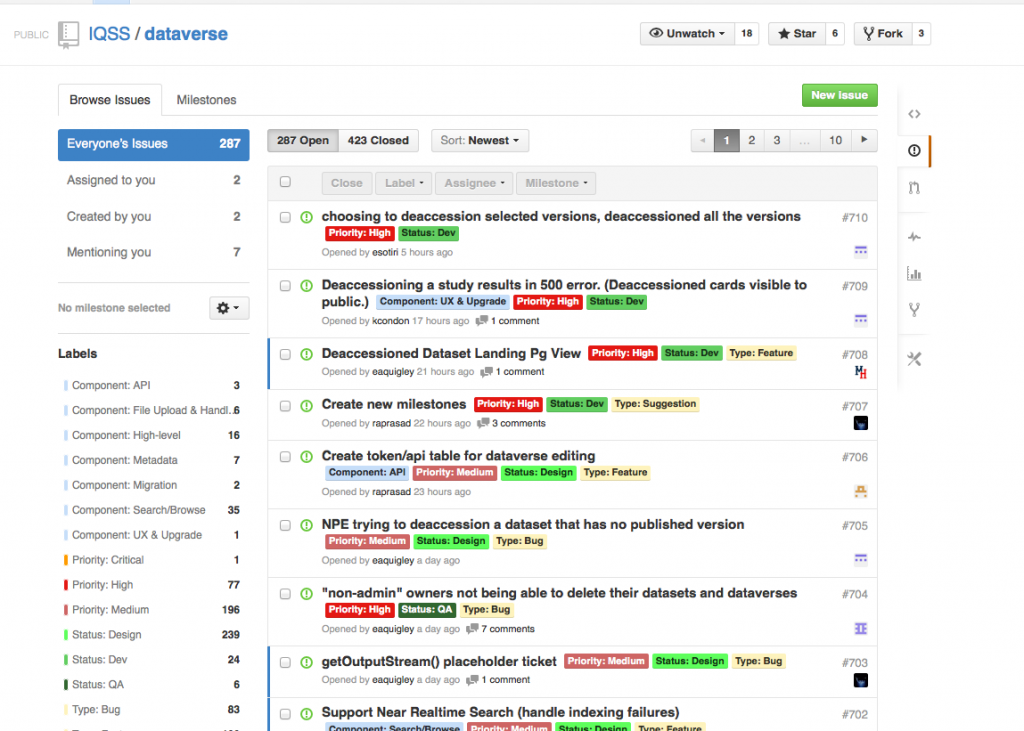
The final migration, runs 1&2, took about 7 minutes for 700+ tickets. The results:

Issues_·_IQSS_dataverse

Overall, it worked fine. We have tweaked the labels since the initial mapping.

Installing Postgis 1.5 + Postgres 9.1.3

To install a local version of a work project, I needed PostGIS 1.5 + Postgresql 9.1 (ideally 9.1.13)

I floundered a bit with before using homebrew and finding this 2012 post on Installing PostGIS with Homebrew

The only differences from the original post were the code changes for editing the homebrew formula:

sudo brew edit postgis15

For the (assumably) newer “postgis15” file, the following 3 changes were made: “postgres9” was changed to “postgres91” (In homebrew, “postgres91” == “9.1.13”):

line 12:    depends_on 'postgresql91'

line 19:    postgresql = Formula["postgresql91"]

line 87:    postgresql = Formula["postgresql91"]

Thanks for the post:)

Shapefile -> Reprojected shp -> GeoJson -> Leaflet

Mozilla_Firefox

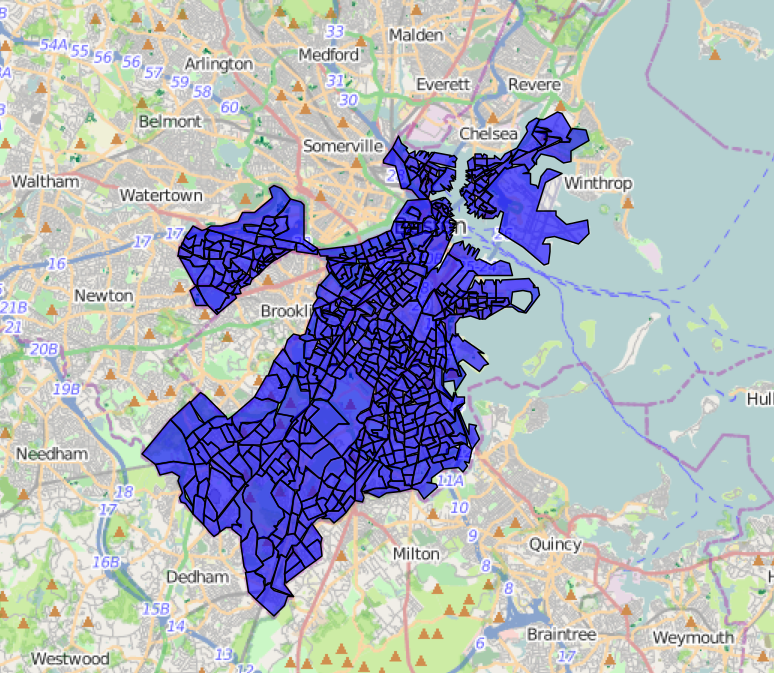
Here’s a not-too-pretty proof of concept script that hastily glues together several blog posts, as noted in the code.

The script takes the following steps:

  1. Takes the path to a .shp file
  2. Reprojects the .shp file to 4326 (without checking if it’s already in 4326–DOH!) (via Python GDAL/OGR Cookbook)
  3. Converts the .shp to GEOJSON (by Shapefile to GeoJSON)
  4. Creates a Leaflet page using Folium (using Folium)
  5. Does all this using way too many libraries:)

from __future__ import print_function import os, sys import json from osgeo import ogr, osr import shapefile import folium def msg(s): print (s) def dashes(): msg(40*'-') def msgt(s): dashes(); msg(s); dashes() def msgx(s): dashes(); msg('ERROR'); msg(s); dashes(); sys.exit(0) def get_output_fname(fname, new_suffix): fparts = fname.split('.') if len(fparts[-1]) == 3: return '.'.join(fparts[:-1]) + new_suffix + '.' + fparts[-1] return fname + new_suffix def reproject_to_4326(shape_fname): """Re-project the shapefile to a 4326. From the Python GDAL/OGR Cookbook Source: http://pcjericks.github.io/py-gdalogr-cookbook/projection.html#reproject-a-layer :param shape_fname: full file path to a shapefile (.shp) :returns: full file path to a shapefile reprojected as 4326 """ if not os.path.isfile(shape_fname): msgx('File not found: %s' % shape_fname) driver = ogr.GetDriverByName('ESRI Shapefile') inDataSet = driver.Open(shape_fname) # input SpatialReference inLayer = inDataSet.GetLayer() inSpatialRef = inLayer.GetSpatialRef() # output SpatialReference outSpatialRef = osr.SpatialReference() outSpatialRef.ImportFromEPSG(4326) # create the CoordinateTransformation coordTrans = osr.CoordinateTransformation(inSpatialRef, outSpatialRef) # create the output layer outputShapefile = get_output_fname(shape_fname, '_4326') #msg('output file: %s' % outputShapefile) if os.path.exists(outputShapefile): driver.DeleteDataSource(outputShapefile) outDataSet = driver.CreateDataSource(outputShapefile) outLayer = outDataSet.CreateLayer("basemap_4326", geom_type=ogr.wkbMultiPolygon) # add fields inLayerDefn = inLayer.GetLayerDefn() for i in range(0, inLayerDefn.GetFieldCount()): fieldDefn = inLayerDefn.GetFieldDefn(i) outLayer.CreateField(fieldDefn) # get the output layer's feature definition outLayerDefn = outLayer.GetLayerDefn() # loop through the input features inFeature = inLayer.GetNextFeature() while inFeature: # get the input geometry geom = inFeature.GetGeometryRef() # reproject the geometry geom.Transform(coordTrans) # create a new feature outFeature = ogr.Feature(outLayerDefn) # set the geometry and attribute outFeature.SetGeometry(geom) for i in range(0, outLayerDefn.GetFieldCount()): outFeature.SetField(outLayerDefn.GetFieldDefn(i).GetNameRef(), inFeature.GetField(i)) # add the feature to the shapefile outLayer.CreateFeature(outFeature) # destroy the features and get the next input feature outFeature.Destroy() inFeature.Destroy() inFeature = inLayer.GetNextFeature() # close the shapefiles inDataSet.Destroy() outDataSet.Destroy() msg('output file: %s' % outputShapefile) return outputShapefile def convert_shp_to_geojson(shape_fname): """Using the pyshp library, https://github.com/GeospatialPython/pyshp, convert the shapefile to JSON Code is from this example: http://geospatialpython.com/2013/07/shapefile-to-geojson.html :param shape_fname: full file path to a shapefile (.shp) :returns: full file path to a GEOJSON representation of the shapefile (recheck/redo using gdal) """ if not os.path.isfile(shape_fname): msgx('File not found: %s' % shape_fname) # Read the shapefile try: reader = shapefile.Reader(shape_fname) except: msgx('Failed to read shapefile: %s' % shape_fname) fields = reader.fields[1:] field_names = [field[0] for field in fields] output_buffer = [] for sr in reader.shapeRecords(): atr = dict(zip(field_names, sr.record)) geom = sr.shape.__geo_interface__ output_buffer.append(dict(type="Feature", geometry=geom, properties=atr)) # write the GeoJSON file out_fname = os.path.join('page-out', os.path.basename(shape_fname).replace('.shp', '.json')) geojson = open(out_fname, "w") geojson.write(json.dumps({"type": "FeatureCollection","features": output_buffer}, indent=2) + "n") geojson.close() msg('file written: %s' % out_fname) return out_fname def make_leaflet_page(geojson_file, ouput_html_fname): """Using folium, make an HTML page using GEOJSON input examples: https://github.com/wrobstory/folium :param geojson_file: full file path to a GEO JSON file :param ouput_html_fname: name of HTML file to create (will only use the basename) """ if not os.path.isfile(geojson_file): msgx('File not found: %s' % geojson_file) # Boston mboston = folium.Map(location=[ 42.3267154, -71.1512353]) mboston.geo_json(geojson_file) #mboston.geo_json('income.json') ouput_html_fname = os.path.basename(ouput_html_fname) mboston.create_map(path=ouput_html_fname) print ('file written', ouput_html_fname) if __name__=='__main__': reprojected_fname = reproject_to_4326('data/social_disorder_in_boston/social_disorder_in_boston_yqh.shp') geojson_fname = convert_shp_to_geojson(reprojected_fname) make_leaflet_page(geojson_fname, 'disorder.html')

Reading Excel with Python (xlrd)

Every 6-8 months, when I need to use the python xlrd library, I end up re-finding this page:

In this case, I’ve finally bookmarked it:)

from __future__ import print_function
from os.path import join, dirname, abspath
import xlrd

fname = join(dirname(dirname(abspath(__file__))), 'test_data', 'Cad Data Mar 2014.xlsx')

# Open the workbook
xl_workbook = xlrd.open_workbook(fname)

# List sheet names, and pull a sheet by name
#
sheet_names = xl_workbook.sheet_names()
print('Sheet Names', sheet_names)

xl_sheet = xl_workbook.sheet_by_name(sheet_names[0])

# Or grab the first sheet by index 
#  (sheets are zero-indexed)
#
xl_sheet = xl_workbook.sheet_by_index(0)
print ('Sheet name: %s' % xl_sheet.name)

# Pull the first row by index
#  (rows/columns are also zero-indexed)
#
row = xl_sheet.row(0)  # 1st row

# Print 1st row values and types
#
from xlrd.sheet import ctype_text   

print('(Column #) type:value')
for idx, cell_obj in enumerate(row):
    cell_type_str = ctype_text.get(cell_obj.ctype, 'unknown type')
    print('(%s) %s %s' % (idx, cell_type_str, cell_obj.value))

# Print all values, iterating through rows and columns
#
num_cols = xl_sheet.ncols   # Number of columns
for row_idx in range(0, xl_sheet.nrows):    # Iterate through rows
    print ('-'*40)
    print ('Row: %s' % row_idx)   # Print row number
    for col_idx in range(0, num_cols):  # Iterate through columns
        cell_obj = xl_sheet.cell(row_idx, col_idx)  # Get cell object by row, col
        print ('Column: [%s] cell_obj: [%s]' % (col_idx, cell_obj))

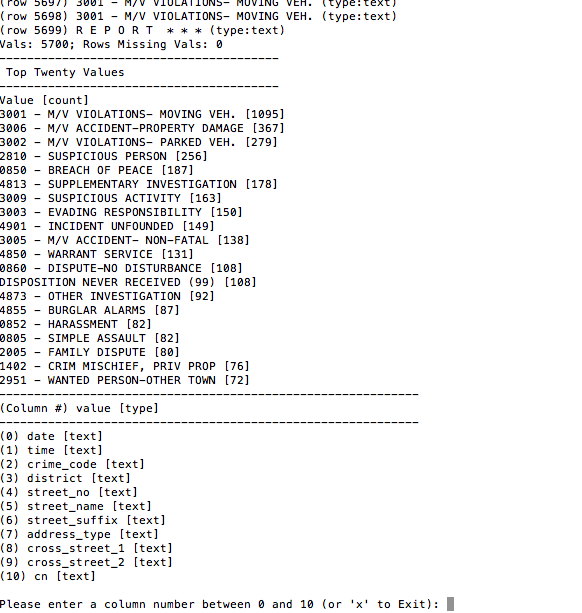
Interact and pull data from a selected column. (This could be done with 1/5 of the code in pandas, etc.)
bin_test_—_python_—_148×44

Code example

from __future__ import print_function
from os.path import join, dirname, abspath, isfile
from collections import Counter
import xlrd
from xlrd.sheet import ctype_text   


def get_excel_sheet_object(fname, idx=0):
    if not isfile(fname):
        print ('File doesn't exist: ', fname)

    # Open the workbook and 1st sheet
    xl_workbook = xlrd.open_workbook(fname)
    xl_sheet = xl_workbook.sheet_by_index(0)
    print (40 * '-' + 'nRetrieved worksheet: %s' % xl_sheet.name)

    return xl_sheet

def show_column_names(xl_sheet):
    row = xl_sheet.row(0)  # 1st row
    print(60*'-' + 'n(Column #) value [type]n' + 60*'-')
    for idx, cell_obj in enumerate(row):
        cell_type_str = ctype_text.get(cell_obj.ctype, 'unknown type')
        print('(%s) %s [%s]' % (idx, cell_obj.value, cell_type_str, ))

def get_column_stats(xl_sheet, col_idx):
    """
    :param xl_sheet:  Sheet object from Excel Workbook, extracted using xlrd
    :param col_idx: zero-indexed int indicating a column in the Excel workbook
    """
    if xl_sheet is None:
        print ('xl_sheet is None')
        return

    if not col_idx.isdigit():
        print ('Please enter a valid column number (0-%d)' % (xl_sheet.ncols-1))
        return

    col_idx = int(col_idx)
    if col_idx < 0 or col_idx >= xl_sheet.ncols:
        print ('Please enter a valid column number (0-%d)' % (xl_sheet.ncols-1))
        return 

    # Iterate through rows, and print out the column values
    row_vals = []
    for row_idx in range(0, xl_sheet.nrows):
        cell_obj = xl_sheet.cell(row_idx, col_idx)
        cell_type_str = ctype_text.get(cell_obj.ctype, 'unknown type')
        print ('(row %s) %s (type:%s)' % (row_idx, cell_obj.value, cell_type_str))
        row_vals.append(cell_obj.value)

    # Retrieve non-empty rows
    nonempty_row_vals = [x for x in row_vals if x]    
    num_rows_missing_vals = xl_sheet.nrows - len(nonempty_row_vals)
    print ('Vals: %d; Rows Missing Vals: %d' % (len(nonempty_row_vals), num_rows_missing_vals))

    # Count occurrences of values 
    counts = Counter(nonempty_row_vals)

    # Display value counts
    print ('-'*40 + 'n', 'Top Twenty Values', 'n' + '-'*40 )
    print ('Value [count]')
    for val, cnt in counts.most_common(20):
        print ('%s [%s]' % (val, cnt))

def column_picker(xl_sheet):
    try:
        input = raw_input
    except NameError:
        pass

    while True:
        show_column_names(xl_sheet)
        col_idx = input("nPlease enter a column number between 0 and %d (or 'x' to Exit): " % (xl_sheet.ncols-1))
        if col_idx == 'x': 
            break
        get_column_stats(xl_sheet, col_idx)


if __name__=='__main__':
    excel_crime_data = join(dirname(dirname(abspath(__file__))), 'test_data', 'Cad Data Mar 2014.xlsx')
    xl_sheet = get_excel_sheet_object(excel_crime_data)
    column_picker(xl_sheet)


using the Django admin to copy an object

I just ran across this snippet from a hasty project last year.  For a course database, an administrator needed an easy way to copy semester details via the admin.

Ideally, the user would:

(1) Check selected semester objects
(2) Choose “copy semester” from the dropdown menu at the top

These options are displayed in the image below.
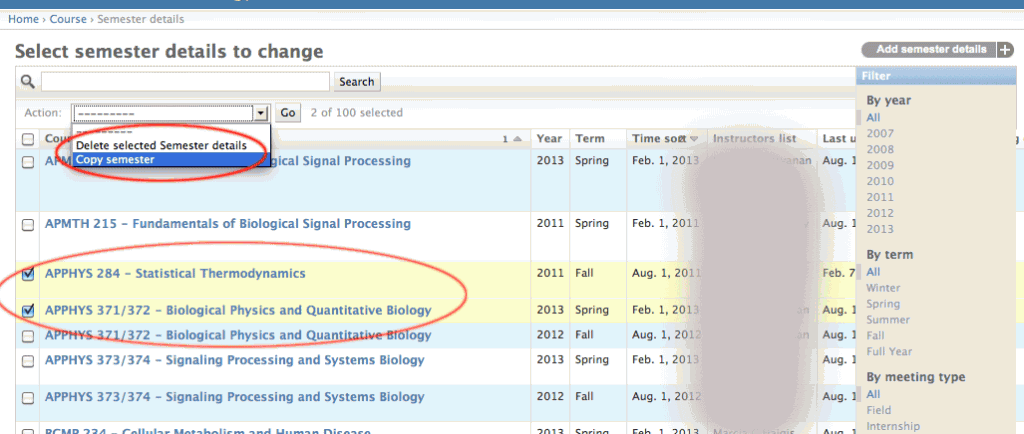
The basics of admin actions are well described in the Django documentation.

For the screen shot above, here is the code used to copy the object, including ForeignKey and ManyToMany relationships.  (Notes about the code follow.)

Location: admin.py

from django.contrib import admin
from course_tracker.course.models import SemesterDetails
import copy  # (1) use python copy

def copy_semester(modeladmin, request, queryset):
    # sd is an instance of SemesterDetails
    for sd in queryset:
        sd_copy = copy.copy(sd) # (2) django copy object
        sd_copy.id = None   # (3) set 'id' to None to create new object
        sd_copy.save()    # initial save

        # (4) copy M2M relationship: instructors
        for instructor in sd.instructors.all():
            sd_copy.instructors.add(instructor)

        # (5) copy M2M relationship: requirements_met
        for req in sd.requirements_met.all():
            sd_copy.requirements_met.add(req)

        # zero out enrollment numbers.  
        # (6) Use __dict__ to access "regular" attributes (not FK or M2M)
        for attr_name in ['enrollments_entered', 'undergrads_enrolled', 'grads_enrolled', 'employees_enrolled', 'cross_registered', 'withdrawals']:
            sd_copy.__dict__.update({ attr_name : 0})
 
       sd_copy.save()  # (7) save the copy to the database for M2M relations

    copy_semester.short_description = "Make a Copy of Semester Details"

Below are several notes regarding the code:

(1) Import python’s ‘copy’ to make a shallow copy of the object

(2) Make the copy.  Note this will copy “regular” attributes: CharField, IntegerField, etc.  In addition, it will copy ForeignKey attributes.

**(3) Set the object id to None.  This is important.  When the object is saved, a new row (or rows) will be added to the database.

(4), (5) For ManyToMany fields, the data must be added separately.

(6) For the new semester details object, the enrollment fields are set to zero.

To hook this up to the admin, it looks something like this:

Note “copy_semester” is added to the “actions” list.

class SemesterDetailsAdmin(admin.ModelAdmin):
    actions = [copy_semester]   #  HERE IT IS!
    save_on_top = True    
    inlines = (SemesterInstructorQScoreAdminInline, SemesterInstructorCreditAdminInline, CourseDevelopmentCreditAdminInline )
    readonly_fields = ['course_link','instructors_list', 'course_title', 'instructor_history', 'budget_history', 'enrollment_history', 'q_score_history', 'created', 'last_update']
    list_display = ( 'course', 'year', 'term','time_sort','instructors_list', 'last_update','meeting_date', 'meeting_time', 'room', 'number_of_sections',  'last_update')
    list_filter = (  'year', 'term', 'meeting_type', 'course__department__name', 'instructors' )
    search_fields = ('course__title', 'course__course_id', 'instructors__last_name', 'instructors__first_name')
    filter_horizontal = ('instructors', 'teaching_assistants', 'requirements_met', )
admin.site.register(SemesterDetails, SemesterDetailsAdmin)

And that’s it!
 

populate a newly made subclass

This is a bit of a hack but I created a subclass* named FacultyMember and wanted to back-link it with existing records in the Person class: (* This subclass falls under Multi-table inheritance.)

class Person(models.Model):
    lname = models.CharField('Last Name', max_length=75)
    fname = models.CharField('First Name', max_length=75)
    affiliation = models.ForeignKey(PersonAffiliation)
    appointment =  models.ForeignKey(AppointmentType)
    # (20+  other fields)
"""
Newly made subclass.
"""
class FacultyMember(Person):
    research_statement = models.TextField()
    journal_articles = models.ManyToManyField(JournalArticle)
    # (approx 6 fields, several of which are FKs)

(Note, the original FacultyMember model was made 2 years before the Person model. The subclassing is a bit of clean-up.)

There are 581 Person objects, 43 of which are faculty members. It wasn’t obvious to me how to create FacultyMember objects from the existing Person objects. One hack was to do the following.

>>> # (1) retrieve a person who is a faculty member
>>> p = Person.objects.get(lname='Smith', fname='John')
>>> p
>>> <FacultyMember: Smith, John>
>>>
>>> # (2) copy the Person object's dictionary
>>> p_dict = p.__dict__.copy()
>>> p_dict
{'grad_program_id': None, 'title_id': 203L, '_state': , 'second_phone': u'',
 'visible': True, 'appointment_id': 22L, 'long_title': u'', 'id': 1607L,
'minitial': u'', 'primary_lab_id': 48L, 'slug': u'john-smith', 'affiliation_id': 11L,
 'room': u'Room 123', 'phone': u'123-456-7890', 'alt_search_term': u'', 'lname': u'Smith',
 'office_id': None, 'second_email': u'', 'fname': u'John', 'grad_year_id': None, 
 'building_id': 1L, 'email': u'jsmith@university.edu'}
>>>
>>> # (3) remove the '_state' key/value from the dictionary
>>> p_dict.pop('_state')
>>>
>>>
>>> # (4) use the dictionary to make/start creating a new FacultyMember
>>> f = FacultyMember(**p_dict)
>>>
>>> # (5) link the Person object to the new FacultyMember via the 'ptr' attribute
>>> f.ptr = p
>>> f.save()
>>> f
>>> <FacultyMember: Smith, John>

That’s it.  I made the test above into a short script and it worked.  Initially I tried to instantiate the FacultyMember using the “ptr” attribute or the associated id.  I may try that again…


python: string to a datetime object

The task of converting strings to date or date/time objects arises fairly often.  For example, a colleague just had a request for a script to parse a log file so that it may be stored in  a database.  The log file looks something like this:

MACHINE001,SOME_USER,9/24/2010 5:03:29 PM,Logged on
MACHINE001,SOME_USER,9/24/2010 5:450:43 PM,Logged off

To convert the date/time section (boldfaced above) to a usable python object, use the datetime module’s strptime function.  For example:

>>> from datetime import datetime
>>> dt_str = '9/24/2010 5:03:29 PM'
>>> dt_obj = datetime.strptime(dt_str, '%m/%d/%Y %I:%M:%S %p')
>>> dt_obj
datetime.datetime(2010, 9, 24, 17, 3, 29)

To go in reverse, use datetime’s strftime.  Following up on the example above:

>>> dt_obj.strftime('%A, %B %d, %Y at %H:%M hours')
'Friday, September 24, 2010 at 17:03 hours'

For full documentation, including definitions for the date directives (%Y, %m, %d, etc.) use the following link:

8.1.7. strftime() and strptime() Behavior

(scroll down for directive defintions.  e.g. “%A” is “Locale’s full weekday name.”, etc)


Evernote, actually saving time

I’m a bit slow with new technology.  At one point in 2002, I was one of the few people in NYC without a cell phone. (But I could use a pay phone at any time:)

Last week a co-worker announced he was leaving to work at Evernote.  I looked up the company, thinking, oh, this is just an old idea, a variation on Mirror Worlds.  But then I downloaded Evernote and this weekend experimented with using it for a (non-programming) side project.  It was fantastic!

The information on the walls pictured below (as well as hundreds of digital files) are making their way to Evernote.   Information included journal articles*, transcripts, photos, a handwritten diagram, and a note on the back of an ATM receipt**.

I was able to organize and synthesize large and small chunks of information in a non-linear way.  The software considerably cut down the time it was taking to find information–letting me focus on my project.

I’ll use Evernote a little longer and then I’ll probably start using it for work projects.  So far Evernote hasn’t gotten in the way and I’m consciously not becoming crazy and trying to catalog everything.

(More importantly: the faster those papers are taken off the wall, the less I’ll be in trouble at home:)

*I’m also using Mendeley for research articles–now if someone could combine Evernote and Mendeley tagging:)

** This year I’m trying to get by without making notes on the back of the ATM receipts.  It’s my default organization method: jot down a quick note, put it in pocket, put the pants (including note), through the washing machine…

django: debugging sql queries in a template

This link to a 3-step Django snippet created in 2007 still works for showing queries within a template:

http://djangosnippets.org/snippets/93/

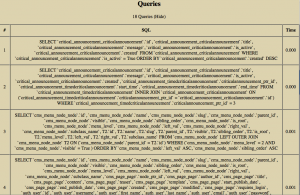
It’s helpful for debugging pages.  For example, adding the template snippet from the link above will show something like this at the bottom of your pages:


For step 3 in the link above, “Use RequestContext when rendering the current template”, include the following in your view file:

from django.template import RequestContext
from django.shortcuts import render_to_response

def view_news_page_by_slug(page_slug):
    # build your page, etc
    lu = { 'title': 'hooray', 'story': 'blah, blah, blah' }
    return render_to_response('your_template.html', lu, context_instance=RequestContext(request))

The template code from the django snippet is fairly straightforward.

To see queries from the python shell, see the django documentation for “How can I see the raw SQL queries Django is running?