Our next update has 2 main components addressing the two constructed parts of our speaker: The mechanical elements, and the electrical elements.
Mechanical Update:
As we continued to discuss our ideas for the housing of the speaker, we discovered that the thermoforming materials that we have access to are only applicable to fairly thin plastics. This would make it a more flimsy product than our original intended vision. In order to provide more structural support for the casing, we now plan to 3D print the back, rounded casing. We hope to begin manufacturing in the next few days. Updated CAD model images are included below.
Casing:


Figure 1 and 2: Layered protrusions from the body which support the handle axels and driver mount.

Figure 3: back of speaker with recessed handle, user handle indentation, hole for volume control potentiometer, and audio jack and micro usb ports.
Fixtures: 
Figure 4: Driver mount with screw holes for driver and connection to casing.
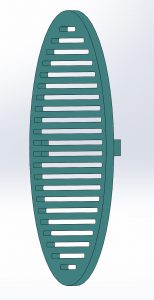
Figure 5: Driver mount with screw holes for driver and connection to casing.

Figure 6: Profile section view of faceplate and driver mount in casing. Casing and driver mount form an airtight seal.
Complete Assembly:
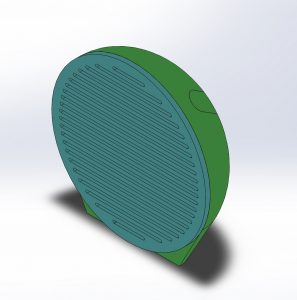
Figure 7: Complete Speaker Assembly
Electrical Update:
Below we have included the schematics for the electrical circuit to drive our speaker (thank you Jim!!). The general idea of the circuit is that there is a Li-Poly battery that gives us the Voltage needed to run the speaker. We then regulate the 5V down to about 4.2V. There are then 2 mirroring circuits that will affect volume control and amplify the sounds slightly. From there, we sum these two signals, and finally input them into a (NAME) chip which acts very similarly to a PWM (control?) which will “magically do the work for you!” -Jim. This output is then connected directly to our driver to produce the intended level of sound.
More specifically, here is a description of the circuit (as described by Jim):
The charger circuit is U2, in the lower left of the schematic.This chip is designed to take a 5V input from a USB cable and charge a lithium-ion battery to its maximum voltage of 4.2V. The battery is connected to J2, to the right of U2. The resulting power source can vary from 4.2V down to 3.5V or lower when the battery discharges. That’s not a lot of voltage, so the rest of the components need to be specially chosen to run on lower voltage. In particular, I needed to find a low-voltage operation amplifier, so I chose the LME49721
Stereo audio comes in on J3 in the upper left and gets attenuated by ganged potentiometers R10 and R18. Putting the signals through potentiometers before going into op-amps is a way to allow the amp to work with large signals that would otherwise have caused the amps to clip.
The main job of U3A and U3B is to present a high input impedance to whatever is driving the amp, but they also add a bit of gain — a factor of two in the audio band. We can adjust this gain by changing resistor values if needed, after listening to the speaker through your phones.
Good progress! Now that you have a circuit approved by Jim, do you understand how an OP Amp works in the various configurations in the circuit? May I suggest this quick easy read http://proquest.safaribooksonline.com.ezp-prod1.hul.harvard.edu/book/hobbies/9781449356200/5dot-the-incredible-op-amp/ch05_html
This would allow you to write about this circuit, without having to quote Jim in the final iteration of this website 🙂
This CAD looks great! Did you design at all to maximize the printability of the part? For the front grille, are those two plastic parts designed to snap together?
The CAD was primarily designed for aesthetics, as we had a strong sense of the vibe we wanted to represent with our speaker. From there, we had to ensure that everything going within the speaker could fit. Those were our main design concerns. In terms of the front grill, the small rectangles were glued- one on each side, and then that entire front piece was connected by force fit- into the rectangle cutouts of the 3D body.
Hi Cole, we didn’t really design for printability. In fact, due to the continuous/round nature of our speaker, it actually made it very difficult to print because the print was too large for the ultimaker printers we have and we wanted to print the entire thing in one piece. That being said, 3D printing was a great fit for our project for this reason.